How to participate in the “Familia Hour”
Thank you very much for your interest in our
project. Please find below the details of instructions to the participants of “Familia Hour”.
In the first place, the photos of parents and
children are indispensable to this production. The whole point is to frame
those pictures with memorabilia of each family, gather the groups of
participants in adequate numbers from different regions, to capture the social
background of different regions through the pictures of the families. I believe
that the more the varieties of regions, the more varieties of parent-and-child
relationships and the social background seen through them, can be observed
close at hand.
How to participate
It’s simple. Apply via the web (please let us know
your E-mail address for the site is now under construction, and we’ll contact you as soon as the site is
ready) and following the instruction, create the frame with the help of your
family. The production will be assembled in Japan and put on exhibition. You
can view the exhibition scenes and reports of the ongoing production in various
locations from our web site.
It is even more effective if the production was
made at schools with a large number of participants. Please inform us of the
date and number of participants when they are fixed(I will probably be showing
up during exhibition. Please follow the instruction below for the production in
a workshop.)
How to make it
Materials: adhesive bond, empty milk carton,
memorabilia and everyone’s big smile!!
①Patch empty cartons together and
create a frame of a moderate size. Create a mold of a frame to be 30cm x 25cm
(12”×9.8”), including a space inside to contain the pictures.
②insert adhesive bond and embed the mold with things, anything such
as watercolors and little objects. Each family should make 2 frames(ex. one
created by the mother and the other by the child. )
③Leave them to dry(about 3 weeks)
④Take the pictures(2 types). Parents and children shall stand side by
side.
A: take a picture of people facing to the left(insertion❶)
B: then, take a picture of them facing to the right(insertion❷)


Insertion❶
Insertion❷
⑤place those photos inside the
frame made in procedure ②(please take the frame out of the mold when dry).
Stick the photos from inside the frame by using a tape, plastic sheet or
adhesive bond.
⑥Make a group of 6 to 7 families
each having made 2 photo frames. Separate the photo frame with the picture
facing to the right from those facing to the left. Place a set of 2 photo
frames of the same family side by side, from the top row to the bottom(insertion❸).
Attach a plastic sheet on the back of the frame (stick the plastic sheet with
an adhesive bond applicable to vinyl). It would be useful afterwards, if you
attached to your frames the number of the group and a mark indicating right or
left for later convenience.)
insertion❸
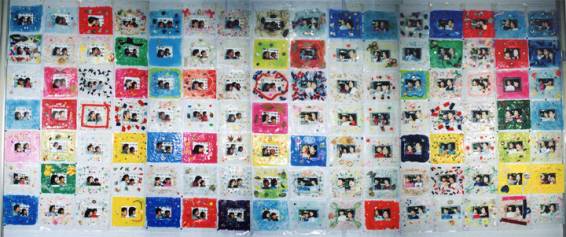
⑦Finally,
all the family photo frames will be lined up. Put the photo frames with a
picture of people facing to the left, in the order of the group number. Then,
from the opposite direction, put the photo frames with a picture of people
facing to the right in the order of the group number. Pin them on the wall with
something like a drawing pin.
Pin everything
on the wall, and the work is finished! Take a picture of the whole photo frames
on the wall and post it on the web. Please send the picture of the production
to the following E-mail address.
The production will tour the countries
that participated in the project. The transmission address and ways of delivery
will be advised afterwards.
Expenses of raw material should be
covered by the participants as much as they can(Delivery fee will be covered by
the project. If by any chance the delivery is not possible, the production will
be exhibited just by means of web.)
Various scenes
of the world can be seen through the pin-ups of yourselves on the wall!! We
look forward to many of you participating in the project!!